Tutorials – UE3 Cascade Introduction
About : This is a basic tutorial on how the UE3 particle editor (Cascade) works. It will "quickly" walk you through
the interface of the editor and explain how a basic smoke particle can be set up.
Target Audience : Unreal Engine users – Beginners
Platform : Unreal Engine 3
Last Update : September 2009
Introduction
The particle system in UE3 is drastically different to its original UE2 variant. Particles now got a brand new and extensive
particle editor and are saved as assets in a package instead of actors in a level or U file.
The ability to save a particle as an asset in a package is great since all levels can now refer to the same particle and if the particle has
to be adjusted it will only have to be done once.
The new particle system is module based. You add blocks of "stuff" if you want to extend a particle. Each module contains new features and properties. We will get back to that a bit further down.
The Basics
Regardless of what I think lets get the tutorial going. The Cascade particle editor can only be accessed via an already existing particle,
thus, if you want to open the editor you should either doubleclick an existing particle in the Generic Browser or simply create a brand new
one. To create a brand new one open the Generic Browser and rightclick in some empty space and choose New ParticleSystem.
If all is right the Cascade Particle editor will open automatically once the new particle has been created.
Particles have a yellow edge in the Generic Browser, if you cannot see it, it might be hidden. Enable the Particle Systems in the top left
of the Generic Browser to show it or simply enable the option Show All Resource Types.
The Cascade Particle Editor is divided into four different areas.
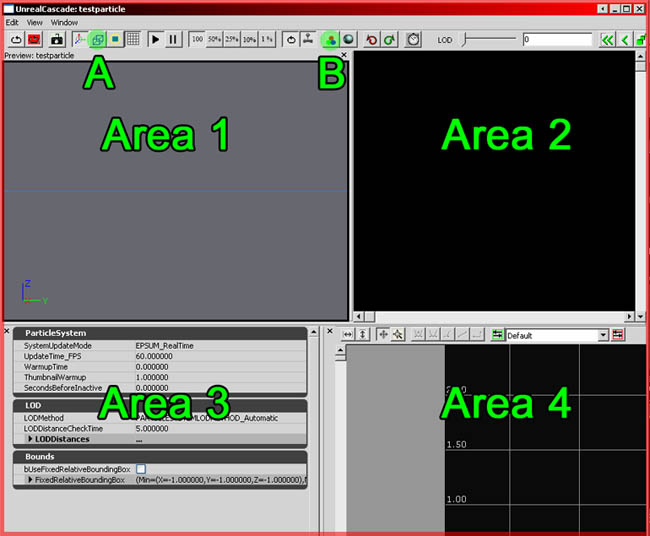
Area 1 is the preview window and it will preview the particle effect.
Area 2 is the list of different Particle Emitters and all of the modules each emitter contains. A ParticleSystem can contain multiple particle
emitters. It is possible to have a waterdrip effect and a watersplash effect in the same ParticleSystem much like what was possible in UE2.
Right now this space is still black because there are no Particle Emitters yet.
Area 3 is the property section and will display the properties of whatever emitter or module selected.
Area 4 is the Curve Editor, used to make smooth transitions from one value to another.
The top toolbar also has two buttons of interest. The wireframe button (A) and the background color button (B). The reason why I mention those
two buttons is because it can be very hard to see certain (especially) smaller particles in the viewport and it often appears as if there
is nothing at all. Switching to a wireframe view might help to reveal where the particles are and how large they are. All other buttons
are not too relevant right now.
Add a new Particle Emitter by rightclicking anywhere in the second area and click on the only option given (New ParticleSpriteEmitter).
You now have a very basic particle.
Now you obviously want to modify the default setup. To do so you can click on any of the modules such as Lifetime or Initial Size. If you
need more than the default settings you can rightclick anywhere in the column and you will get a list of additional modules you can add.
The Smoke Example
Since an example explains things best we are going to go through all the steps required to make a basic smoke particle
setup that spawns and rotates particles, fades in and out, and grows in size.
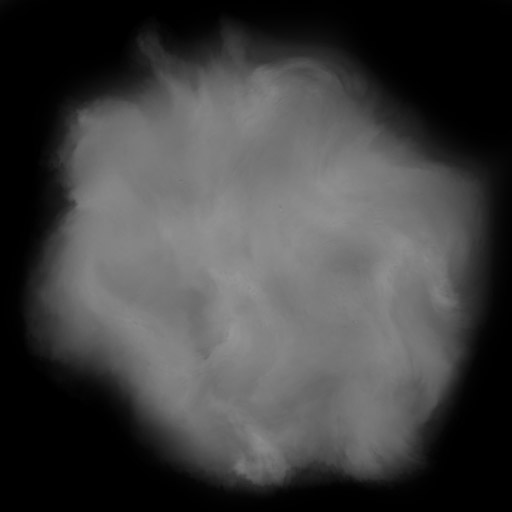
First of all you need a cloud material. Create your own cloud texture or use mine. Rightclick this image and save it somewhere. Preferably convert
it to BMP or TGA before you import it.
Add the texture to a material and set it up as displayed in the picture.
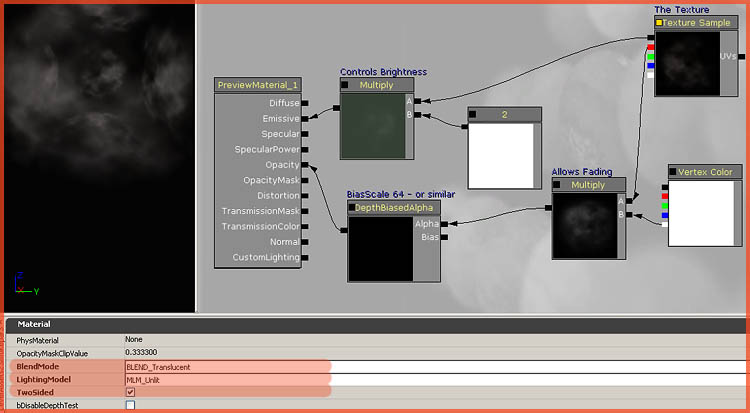
The DepthBiasedAlpha will make sure it is a soft particle. When a particle sprite intersects with a piece of geometry the DepthBiasedAlpha will fade out the sprite along the edge.
The Vertex Color expression is actually really important. All materials that are used in particles must have a Vertex Color expression because it allows Cascade to change the opacity and color of the particles. Without a Vertex Color you cannot fade out a particle for example.
If you are new to the Material Editor, be sure to take a look at my Material Editor tutorials
Once the material has been set up it can be applied to the Particle System. Be sure to have the material selected in the Generic Browser and
then select the Particle Emitter in Area 2 and assign the material to the marked spot.
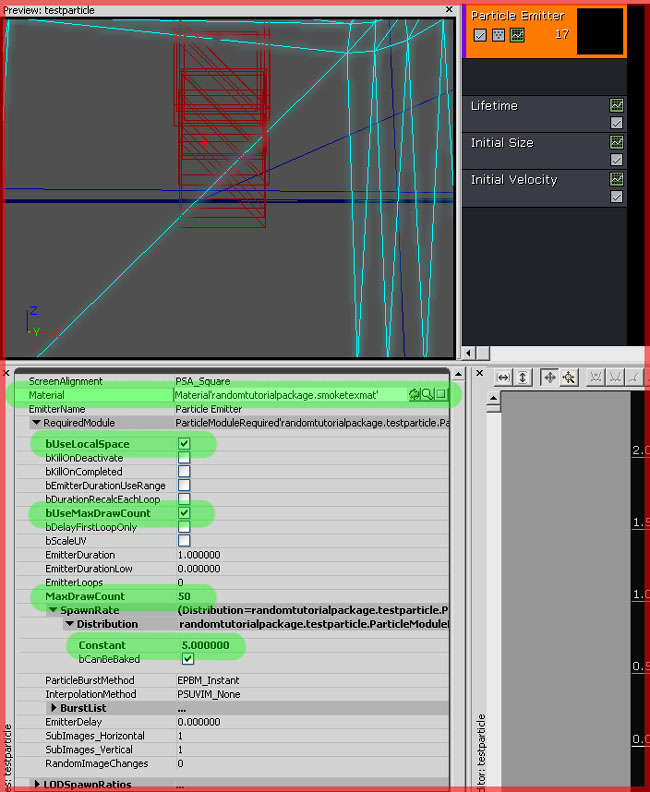
Update September 2009: In newer versions of the engine the properties displayed above have moved to the sections Spawn and Required instead.
Next open the section RequiredModule right below the Material input field and modify a number of properties.
regular rotation tool.
dependent on the height of the Spawnrate number.
Leave all other settings on the default settings for the time being. Note, if the particle only shows up in wireframe view don’t panic.
It may be normal behavior because of the VertexColor node in the Material Editor and will be resolved later.
Select the Lifetime module in Area 2 to make its properties show up in Area 3. In that module change Max to 3.0 and min
to 2.5. This controls the maximum time a particle lives before disappearing again.
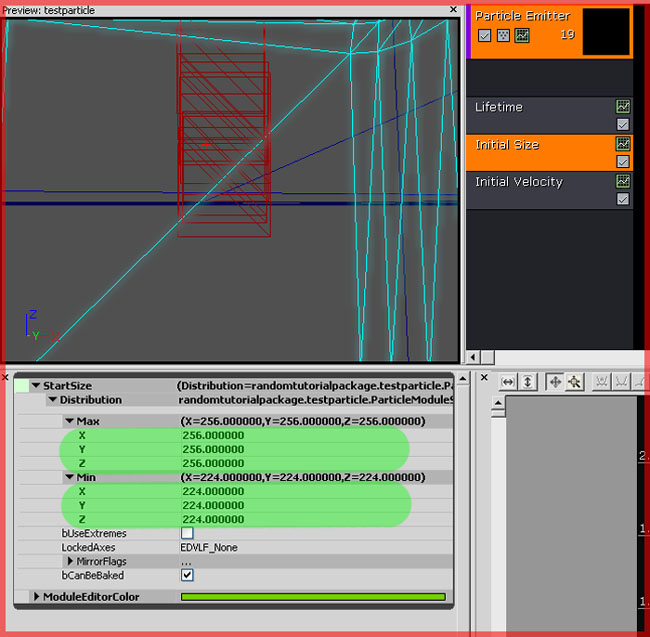
Click on the next module which is Initial Size and set Max X, Y and Z to 256.0 each and Min X,Y and Z to 224 each. This
will give the particle a random size in between 256 and 224. Feel free to use any other kind of number too of course, in case the difference in size is not big enough for you.
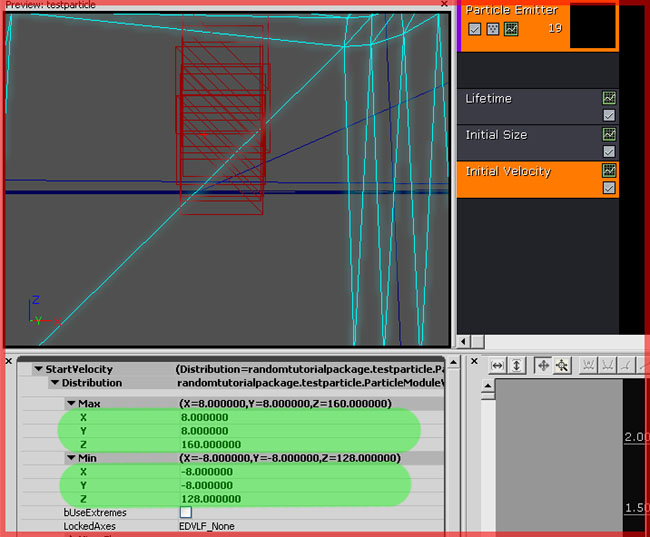
After that select the module Initial Velocity and set Max X and Y to 8 and Z to 160. Set Min X and Y to -8 and Z to 128.
Velocity controls the direction and speed. In this case the smoke will rise with a speed between 128 and 160 and will have a subtle random
movement to either the left, right, front or back.
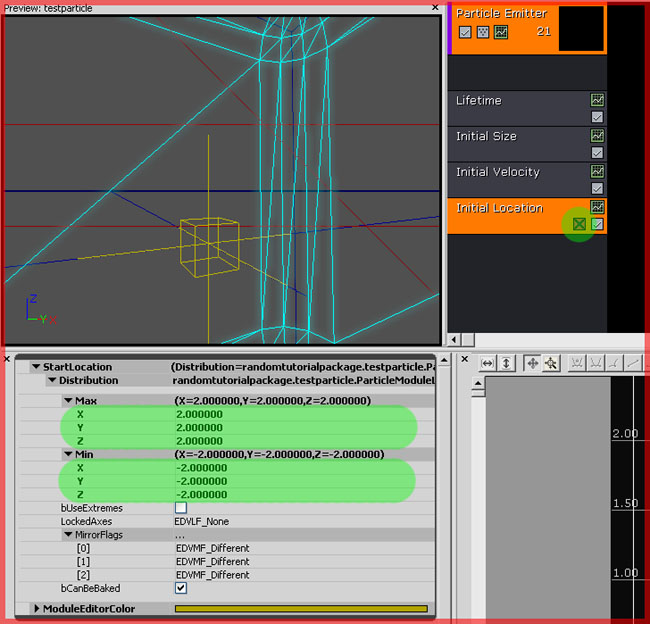
The next thing you want to do is to give a random start location to the smoke since you don’t want all of the sprites to start at the exact
same location. The default modules do not allow you to set a random start location so you will have to add a new module to the Particle Emitter.
Rightclick in the column of the Particle Emitter in Area 2 and choose Location -> Initial Location. Once added, click on
it to get to its properties.
Change all Max numbers to 2.0 and all Min numbers to -2. This gives you a 4 unit width box in any direction and thus a maximum
of 4 units offset for a particle.
Also note: if you click the red crossed box on the module the viewport will show a wireframe box to indicate
the spawning area.
Now there are two more things you want to do before the smoke particle is done: Fade out and making it grow. Both actions are performed by
using the Curve Editor.
Lets tackle the fading first. Rightclick the Particle Emitter column and add a new module: Color -> Color Over Life. If your
particle didn’t show up in a non wireframe view at first, it probably will do so now.
To add the Color Over Life module to the curve editor and finally gain some functionality for it click the little button on
the module. Curves can be hidden by clicking on the little yellow square in the left column of the Curve Editor. Do so for the Color Over
Life Curve since you don’t need this at all right now and it will be in your way when working with the Alpha curve.
Now, you may notice that you either can’t see the Alpha Curve or that you can’t add extra control points to it. The reason for that is because
the AlphaOverLife Curve is always wrongly configured by default, it is configured as a constant simple number and you obviously don’t want
a simple number but a whole curve to control it.
Expand AlphaOverLife in the left properties section and click on Distribution until you get a blue triangle button on
the right of it. Click that triangle and choose DistributionFloatConstantCurve.
Update September 2009: No need to change the Distribution type anymore in newer versions of the engine. It is set to the correct type by default nowadays.
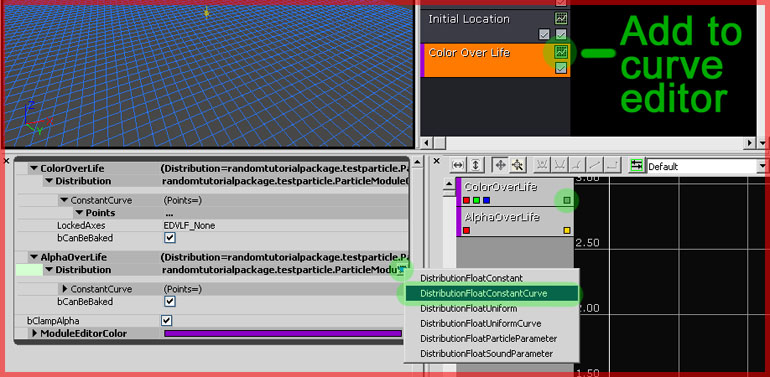
Left clicking and dragging makes you pan through the Curve editor view, the mouse wheel zooms in and out. If all is right you could see a
flat purple (could have another color too) line in it. This is the AlphaOverLife Curve. The horizontal numbers are the time. Vertical is the
amount. Add a control point by holding Control on your keyboard and click somewhere on the line. You need two controls points, one at 0 horizontally, and one at 1.0 horizontally.
You can move a control point by holding Control on your keyboard and dragging the point up. Move the first control point up to around
0.25 vertical. Leave the other one unmodified. You now have a curve that begins at value 0.25 and then fades to value 0. Or in other words, it begins with 25 percent opacity and goes to 0 percent throughout its life.
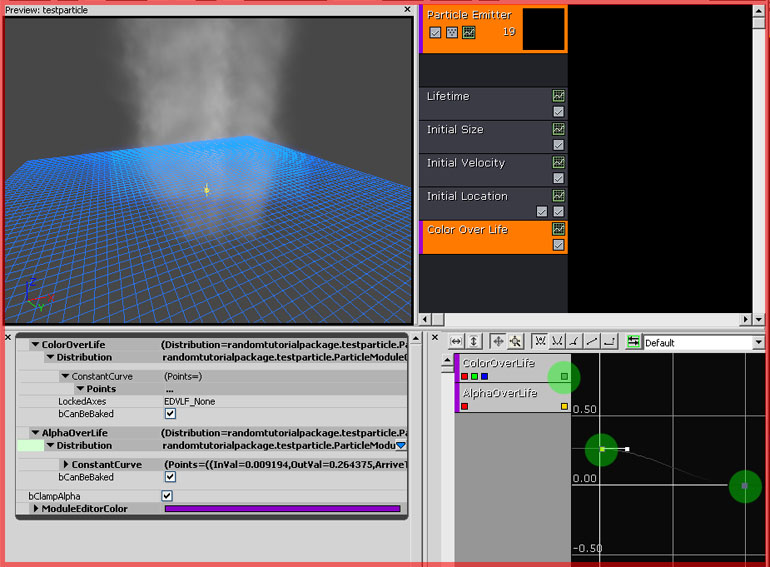
The smoke now fades out. To make it fade in you would need to add a 3rd control point in the middle and set the first control point back at
0,0.
The last thing to do is to make the particle grow in size. This too is done with the curve editor.
Rightclick the Particle Emitter column in Area 2 and choose Size -> Size By Life. Then click on the little scanline button
to add the module to the curve editor, like you’ve did for the Color Over Life module as well.
Click the little yellow square of the AlphaOverLife section in the curve editor to make its curve invisible as it will only get in your way
when working with the Size curve.
The LockedAxis property in must be set to XYZ because that gives you just one curve to work with rather than three. And that is much easier.
Also, you may need to set the Distribution to DistributionVectorConstantCurve again, exactly like you did before with the Alpha Over
Life module.
Once you’re done with all of that add two control points to the curve, one at 0 and one at 1. Move the first one slightly up
and the second one a lot.
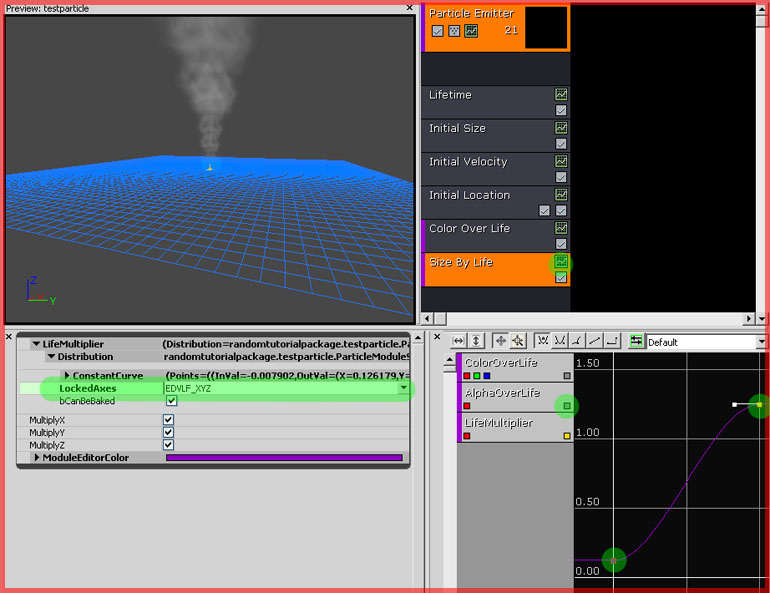
You’re done! Exit Cascade. Be sure to have the particle selected in the Generic Browser and then rightclick a surface in your level and Add
Actor -> Add Emitter.
If the particle looks too thin add more particles to its spawnrate. Also it may be a good idea to add the module Initial Rotation, just to give each particle a random rotation. Looks more natural.
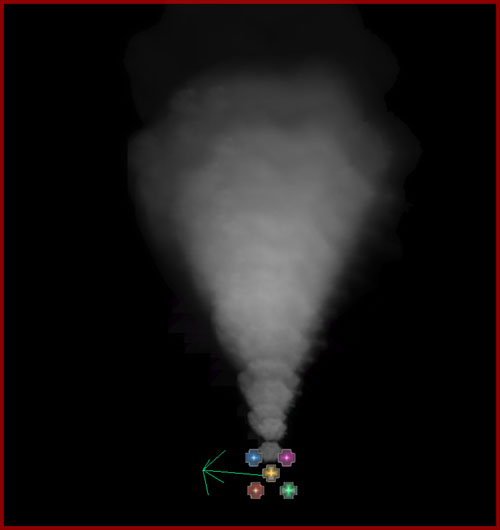
Be sure to save the package the particle is in!
Also note that, contrary to UE2, particles can now be scaled! You can freely scale the drawscale of the particle and the particle will scale
accordingly.


