


Tutorials – UE3 Modeling 2 – Advanced
About : This tutorial will dive deeper into modeling for UE3, and why you would want or would not want to do certain things.
Target Audience : Intermediate.
Platform : Unreal Engine 3
Last Update : November 2007
Common questions
What is the maximum polycount?
There is none, kind of. You can import models of any polycount into the engine, but anything over a few ten thousand will import very slowly. Even while you can, it is not advisable to import models of several tens of thousands of polys. Most models are only somewhere between a hundred and a few thousand polys.
Maximum polycount in view wise, you usually do not want to supercede a few hundred thousand, but this depends on the circumstances. For example, a lot of transparent surfaces would make performance suffer much quicker already, and too many different textures per mesh will do so as well.
How many textures can a mesh use?
There is virtually no limitation on the number of textures a mesh can use, but usually no more than two is advised. The reasoning behind this is explained in depth in my tutorial on mesh rendering.
The rule of two is not holy at all. This depends on the specific situation in which the mesh will be used. For example, if a mesh will only be used once it will do just fine with ten to twenty different textures without too much of a performance impact. However, if a mesh is used 10 times, any performance impact the textures have is immediately multiplied by 10, and that’s where the performance penalty will truly become clear.
So, in general the rule goes that the more unique a mesh is, the more textures it may use. A landmark can use many, a crate used dozens of times however can’t.
How large can a mesh be?
A mesh should not be larger than roughly 600 000 to 700 000 units or it will be way out of the grid. However, skyboxes aside, very few meshes ever need to be that large. There is virtually not limit on the size of meshes, but do keep in mind that the larger a mesh, the harder it will be for the engine to occlude it and to light it without a performance penalty. These problems will be discussed in detail below.
In general it is a good idea to split large meshes such as landscapes into several smaller pieces. Overly complex models are usually also better off in several smaller models, most namely because of the lighting, as also discussed into detail further down below.
Can I model the entire level?
Yes you can. You do not need to use BSP if you do not want to. However, even while modeling an entire level may be possible, an incorrect approach will make performance suffer heavily. Meshes that are too large will be hard to occlude, as mentioned before, they will put a huge burden on the system when lit with dynamic lights, and they will eat considerable amounts of memory. If you want to model an entire level, you should split it into many small parts, and reuse as many parts as you can. Unreal instances meshes so if you have the choice between placing a crate in the level in your 3D package, or in Unreal, you should go for Unreal.
If you do not, the crate will be rendered as an entirely new object, where as if it were placed as a mesh in Unreal, it would be remember from the last time the crate was used, which is obviously faster.
Bottom line is, create the hull of the level in your modeling package of choice, and anything else that is large and unique. All small details however, should be placed as much as possible in the editor itself. Refrain from already placing trees, lamps, pillars, crates and so on in a 3D package, but keep them as separate individual models and place them after importing. This will also aid your workflow on the long term, even if it may feel limiting at this moment.
Occlusion
All meshes, terrains, and BSP brushes in UE3 automatically occlude whatever there is behind them. Unlike terrain and BSP, meshes cannot be occluded partially. Either a mesh is rendered, or it isn’t.
As soon as one little piece of the mesh is in view, the entire mesh will be rendered. If you can see the top of a mountain in the distance, the entire mountain will be rendered. The implications this has on your models is that very large models will never be occluded as there is always some poly somewhere in view. Therefore, your meshes should not be too large, and if they are, you must split them into smaller sections.
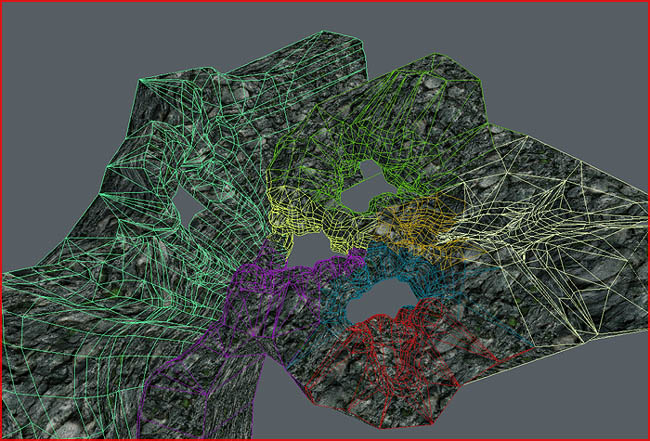
This large mesh was split into several smaller meshes to aid occlusion and lighting. Because all of these meshes share the same location, the whole can easily be reassembled in the editor by simply giving every element the same location coordinates (Properties – Movement – Location). Trying to align every element by moving it over the grid would be insanity.
Understand that even the smallest hole can have a dramatic impact on a mesh’ ability to occlude what’s behind. A tiny hole in a mesh may force half the level behind it to render, obviously impacting performance.
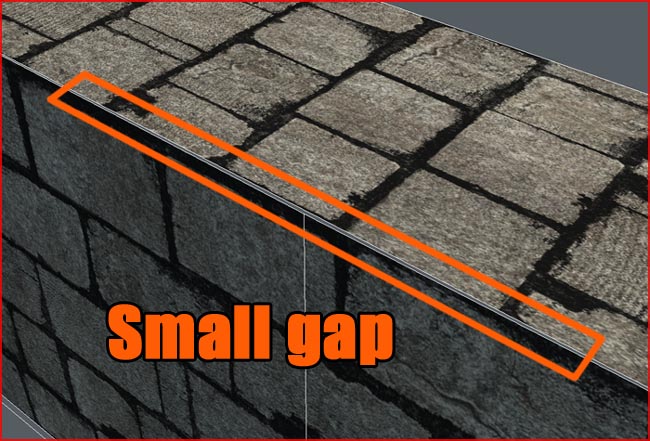
The tiny gap in this mesh will prevent the occlusion from doing what it should.
If you have a large (small meshes are too small to occlude anyhow – thus having no influence) mesh that intentionally has small holes throughout its body, you may want to close those holes to optimize occlusion.
Dynamic Lighting
How much of an impact dynamic lighting has on performance depends largely on how many dynamic lights hit the same object. The higher the number of dynamic lights that hit the same surface, and therefore the same mesh, the slower it will run. That is also the reason why Doom 3 was so incredibly dark, they had to made sure few surfaces were hit by more than two lights, hence why there was a space of darkness between every light.
Even while Unreal does not need lots of shadows to remain playable (praise static and baked lighting for that), you do still need to be careful with dynamic lights.
Large meshes are likely hit by a number
of dynamic lights simply because of their size. Weapon fire for example is a dynamic light, as would be the light of a CTF flag, and certain light effects such as watercaustics. These kind of lights are likely always touching a large mesh somewhere and somehow. A dynamic light that hits a large mesh on this side of the level, will also mpact perfomance on the other side of the level, provided the mesh covers such a large area.
The editor features a Light Complexity view to highlight those meshes lit by too many lights (in every viewports toolbar, near the P button).
In following example the dynamic lights do not seem to light up the large sphere in the background…
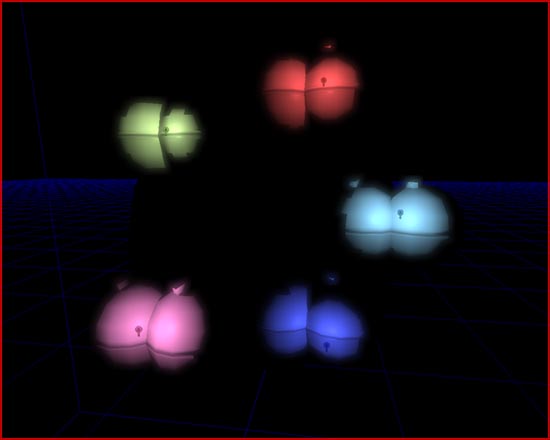
…and yet they do
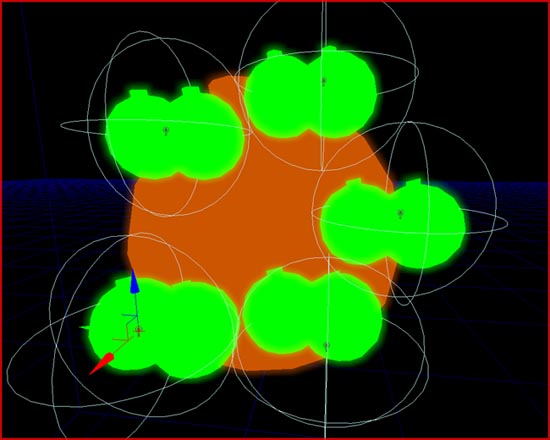
Because the sphere is so large, it is taking light from many different dynamic lights. Where as the small sphere are green because they are only hit by one dynamic light, the large sphere turned orange because five lights are influencing it. Large meshes in combination with many dynamic lights usually means trouble.
Bottom line: dependent on the type of environment and the location of the model, you may want to cut it up dramatically. If a level is planned to make extensive use of dynamic light, you should cut your meshes into many small pieces. Likewise, if a level is not planned to make extensive use of dynamic lights, you can get away with a mesh cut up in rather large pieces like the rocks featured in the Occlusion image.
Decorative meshes outside the playable area usually do not need to be cut up at all, as they are usually not reached by any dynamic lights from within the level anyhow.
Static Lighting
The engine offers two types of static lighting: Vertex Lighting and Lightmapping. Your mesh needs to be prepared in a different way for each of them.
If you are unfamiliar with the concept of vertex lighting, please refer to my vertex lighting tutorial. Similarly, I also have a tutorial on how to set up lightmapping for a mesh in UE3.
It is important to know that not everything can be lightmapped for performance reasons, you need to do as much as you can with vertex lighting and save lightmapping for the large and important objects that benefit from sharp and well defined shadows. If you have a large model, you usually only need to lightmap some elements of the mesh, namely the larger surfaces. Anything small will do just fine with vertex lighting. You need to split your model into a lightmap and a vertex lighting section.
An example will illustrate this best:
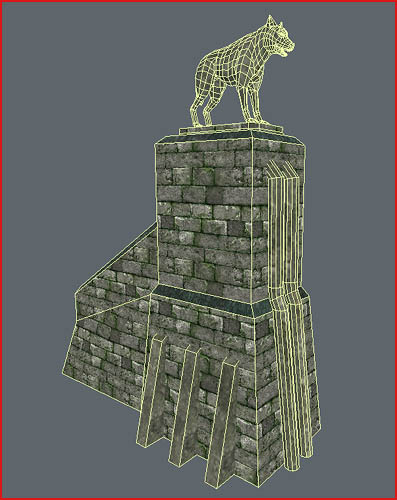
This most awesome model of a large pillar with a statue on top will do well with lightmapping as it is quite large and has a number of large flat surfaces. However, several of its smaller or higher detailed elements will do just fine with nothing more than vertex lighting, and will eat up very precious lightmap UV space if left untouched. You’ll need to detach these elements into a second model, so you can make maximum use of the lightmap UV space for just the larger and more important surfaces.
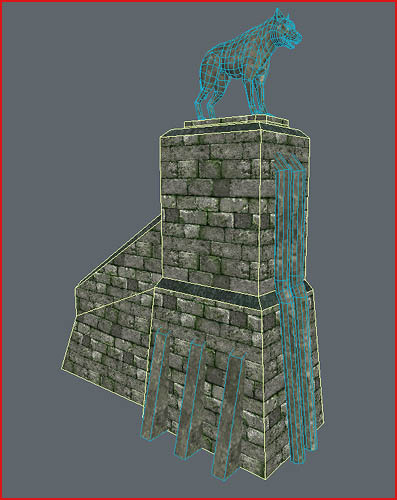
The model has now been split into two models.
The same is true for models that have large surfaces out of reach from the playable area. If these surfaces are left untouched, they would consume large amounts of UV space, thus downgrading the lightmap quality on surfaces near the player.
Another example:
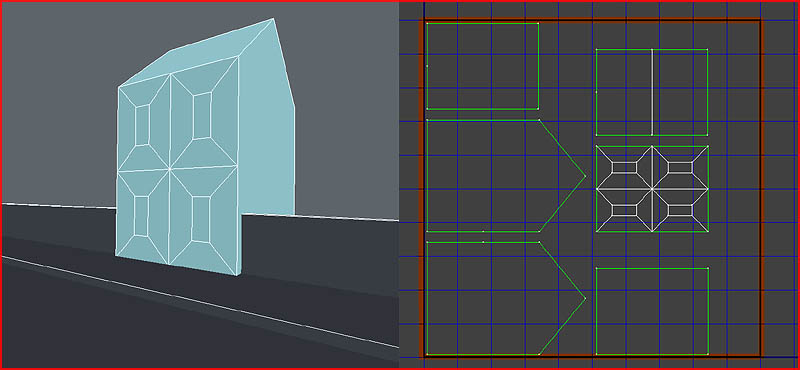
The player can only get close to the front side of this house, but the large walls on its side, back, and its roof eat up a large amount of UV space, while that space should have been used to touch up the more important front.
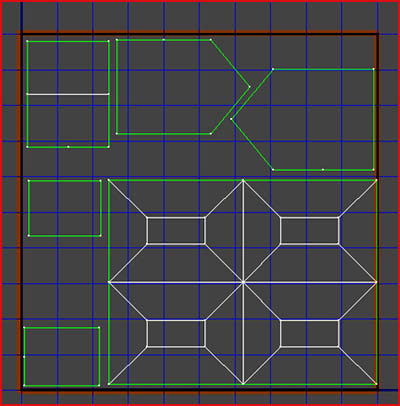
In this improved UV setup, the side, back and roof surfaces have been scaled down to make more room for the front.
Texturing
As thoroughly explained in my mesh rendering tutorial, the amount of different textures/materials on a mesh will have a large impact on performance. The engine renders every mesh on a material per material basis. If a mesh has many different materials, the engine will need to go through many steps before it finally manages to finish rendering the model. On the other hand, if a mesh only has one material, the engine only has to issue a render task just once.
Like explained in the questions at the top of this tutorial, a maximum of two materials per mesh is advised, but in the end the real maximum depends on what you are going to do with the mesh.
For efficient texturing you should keep in mind which sections of your model will be lightmapped, and which will be vertex lit. For example, if your structure uses 2 materials and consists of two meshes: one large mesh for lightmapping, and one smaller mesh for vertex lighting, it would be very bad if both meshes were to use both materials as it would result in 4 render tasks (2 meshes with each 2 textures – whether or not those textures are actually the same doesn’t make a difference to the engine).
Instead, it would be much better if both the lightmapped mesh as the vertex lit mesh would have its own dedicated material. This way there are only two render tasks issued, yet, memory wise, the structure as a whole still uses just as many materials as before. Combine those textures of those elements that belong to the same type of mesh/sub element, not only to the same structure in general!
What I am trying to say is that the way you texture an object greatly depends on how it will be lit, how it will be cut up for occlusion, and how many times the mesh will be used. You need to have an overview at the bigger picture as there are no definite answers.