Tutorials – UE3 Water Outdoors
About : An in depth Unreal Engine 3 material tutorial that focusses on how to create a material for a large outdoor surface of water.
Target Audience : Unreal Engine users – Intermediate to Advanced
Platform : Unreal Engine 3
Last Update : October 2007 – Quick note added April 2011
Introduction
A water material is one of the most complex materials out there. If you want to be able to create a complex material you first need to get yourself a clear idea of what the material would have to do. What are the features the material requires to achieve the desired result? In this case, the water material will be an unlit material since unlit materials render a lot faster, and usually there is absolutely no need for litting water either. That said you need to realize that this will basically disable normal mapping on the surface. Also, unlit rendering also means no phong shading and other form of specularity, again two things you desperately need. We will have to remake all of those effects by faking it using just Diffuse/Emissive.
Update April 2011: You can actually make lit and translucent materials now in the latest versions of the UDK – not covered in this tutorial.
So, what does the material need to do:
Real time reflections are possible but quite hardware demanding, and usually also simply useless. The tutorial will therefore be focussing on static reflections. I have a seperate tutorial available that covers real time reflections.
Apart from lacking real time reflection, it must be noted that my water is quite over the top and that it is possible to build this material using fewer expressions, or to leave certain features out. However, for the sake of the tutorial, I went all the way.
Water
In order to create water you need a number of basic bitmaps. Click the image to download the zip with the required images inside, and import those into a package in the editor.

“Waternormal” and “Waves” will both be used to distort things, “Dots” will be used for faking specularity, and “Skyreflection” will serve as a basic reflection. Unlike the old days there is no actual water texture anymore as everything will be done real time now. The only time when having an actual surface texture is required would be when creating either heavily stylized water, or dirty water such as swamp or sewer water.
Also note, the zip also includes reflec.tga, which is used for Water Tutorial 2 – Indoor Water. It serves no use for this tutorial. Besides that, the zip also includes a SimplePlaneMesh.ase. You could import this mesh as a Staticmesh if you wish to use it as the watersurface, this would automatically get you the intended texture scaling where as a BSP sheet would not, plus, a BSP sheet may cause issues with lighting and is therefore not advisable.
Also, it might be a good idea to not compress waternormal.tga. The texture will be used extensively, and when compressed compression artifacts may be very noticeable. This is not ideal for performance, so only do this when you really want the very best result.
Importing a raw texture can be done by enabling these properties, both in the import window as once imported (rightclick – properties).

Update April 2011: You can no longer prevent a texture from being compressed in the newest versions of the UDK. You are going to have to go with a compressed texture, or add in the channels into alpha channels in Photoshop, given Alpha is near uncompressed.
You are about to create following setup:
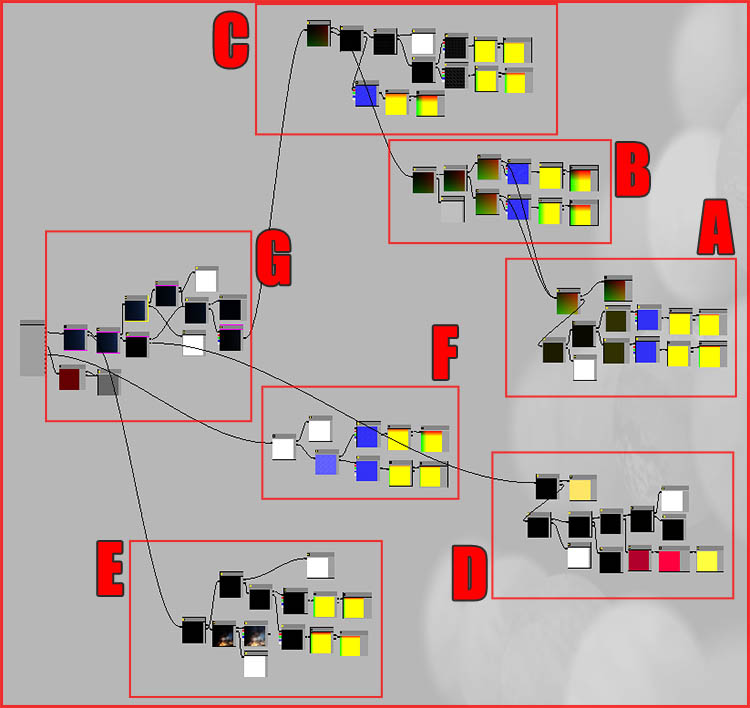
While this may intimidate you, it is to be noted that this is nothing more than a number of fairly simple expression groups linked together. By looking at each group individually, it should be a whole lot less intimidating already. Lets line those groups up:
A.) Creates the basic distortion by blending several panning “Waternormal” textures on top of each other.
B.) Similarly, B. also creates distortion by blending more textures on top to further distort the result.
C.) Similarly to A and B. C creates even more distortion by blending more textures on top of the result. C. focusses mainly on larger distortion such as the waves.
D.) Creates the reflection of the sun on the watersurface.
E.) Creates specularity using the “Dots” texture.
F.) A simple group that’s responsible for distorting what’s below the surface.
G.) The final group that holds the actual sky texture. It’s the central place where all other groups are combined together.
Group A
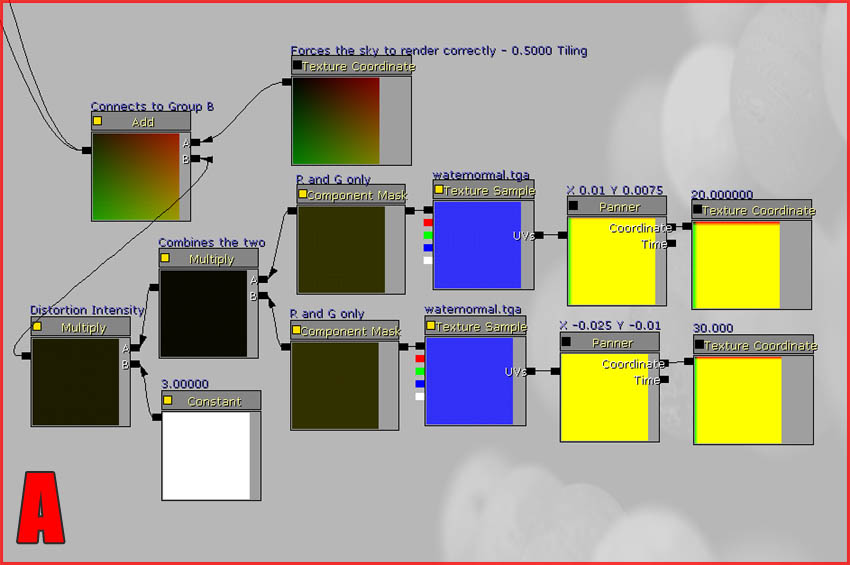
Recreate the entire group as shown, with the values as shown. This group uses the Waternormal.tga twice, each time with a different pan speed and scale, and then blends both of them together. The result is a random look.
One special thing to note are the two ComponentMask expressions that strip out the blue channel from both distortion setups. This has to be done because this entire setup will be used as UV coordinates later on. The engine wouldn’t accept a full RGB input as RGB has three values, R, G, And B. Therefore one value needs to be stripped out so there are only two values left, just like UV requires (U and V = R and G, in this case at least).
Also of note is the Texture Coordinate at the end of the group, without this expression the sky texture would render entirely wrong.
Group B
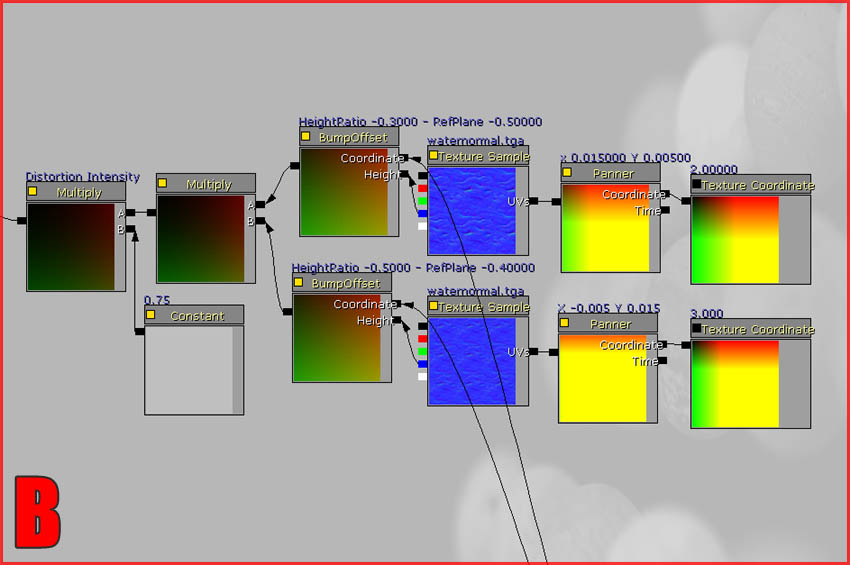
Group B basically does the same as A. It blends Waves.tga twice, each has a different scale and speed. The final Add expression of Group A is used as the Coordinate input on both BumpOffset expressions.
Be sure to notice how only one color channel of waternormal.tga was used. On both TextureSample expressions, only the blue channel is used. It doesn’t really matter what channel is used, as long as you don’t use the full RGB output. This restriction is similar to what was explained in Group A. The information will be used as Height input, which can only handle one bit of information, therefore, input just one channel.
Group C
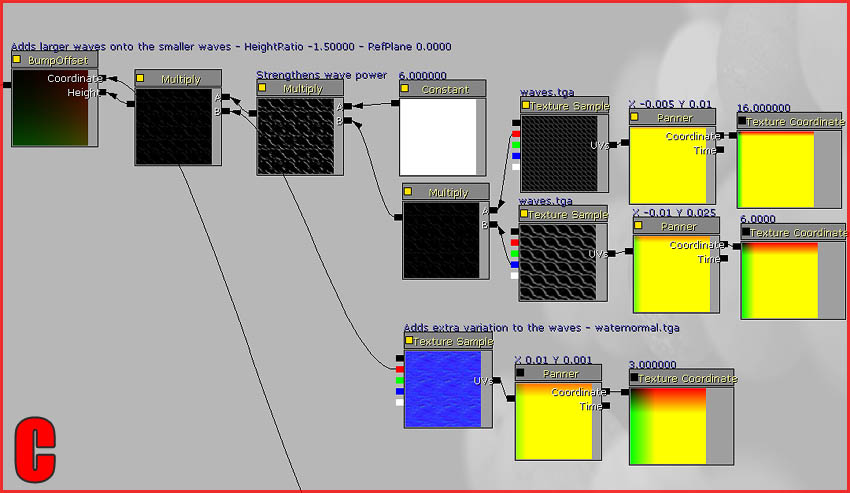
The final Multiply expression of Group B is used as the Coordinate input of the BumpOffset in Group C. This entire setup basically does something very similar to Group B, only this time it uses Waves.tga and blends it a third time with Waternormal.tga. This last distortion group is responsible for the larger waves.
Group D
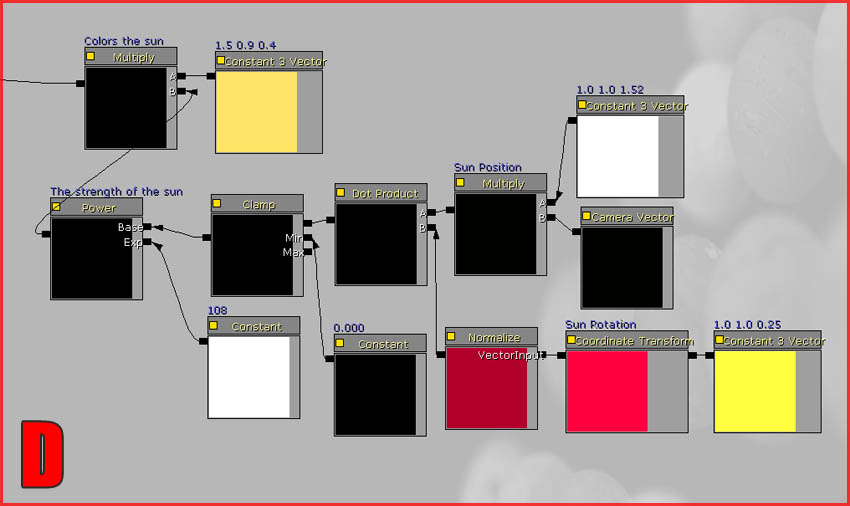
Leave groups A, B, and C alone for the time being, move to an empty space below them and start off with Group D. This group will create the sun’s reflection on the water. This is most complex and most difficult set of expressions in the material as it relies on a good amount of math to do the trick. The two Constant3Vectors on the start of the group basically act as coordinates for the position of the sun. These are then combined with the camera angle and entered into a Dot product, responsible for the sun’s actual “dot”.
Update: In the latest builds the Coordinate Transform expression has been renamed to Transform in the expression list, and will show up as Vector Transform once added to the material.
Group E
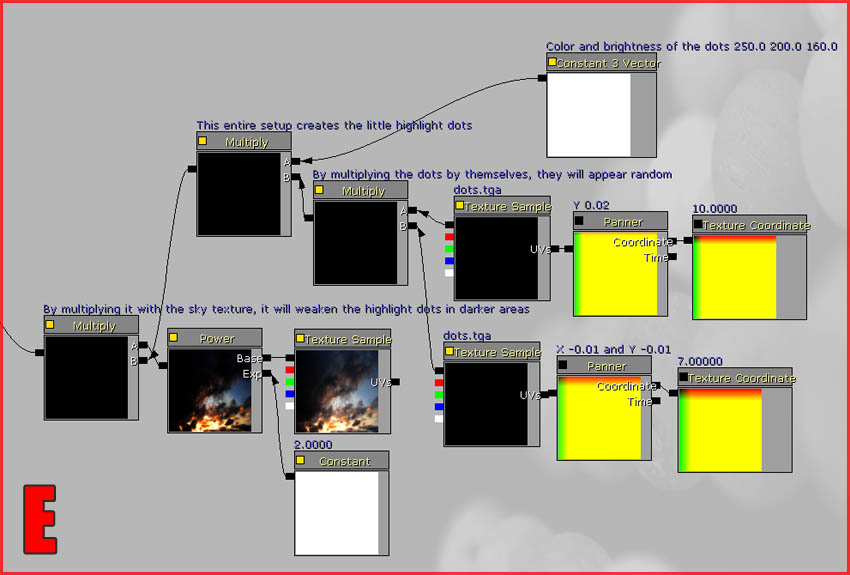
Group E is fairly simple and takes care of the little highlights you often see on water. Basically all it does is to blend two differently scaled dot textures on top of each other to randomize the result. These dots are then colored, and finally the result is multiplied with the sky texture so to make the dots take the reflection brightness of an area into account.
Group F
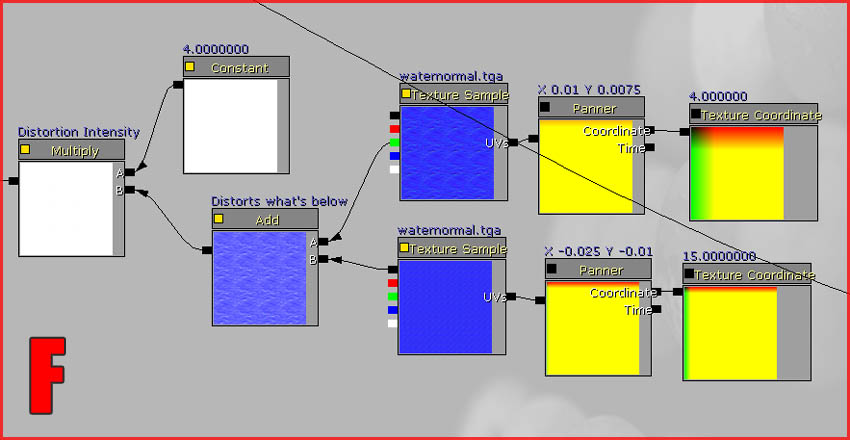
Group F is a simple one. If you want, you could duplicate (Ctrl W) a similar setup from Group A, B, or C and tweak the values a little, or just remake it from scratch if that’s more enjoyable. Group F simply blends to textures together, bumps up the intensity a little and uses this as Distortion. You can already connect the final Multiply directly to the Distortion input on the Material.
Group G
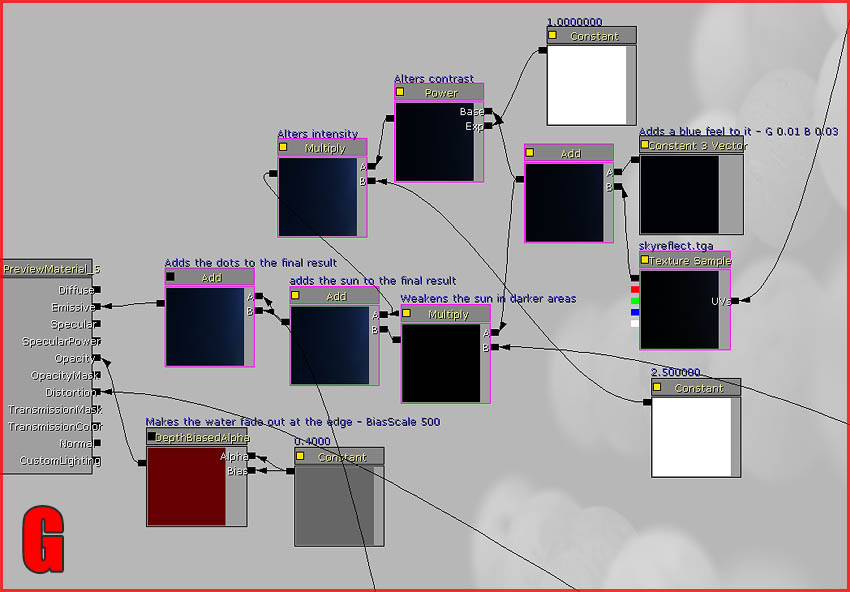
You’re nearly there! Group G combines everything together and takes care of the Opacity and fading of the water. The first expression of this group is the Texture Sample that holds the “Skyreflection” texture. Its UV’s are offsetted by the BumpOffset at the end of Group C. The Texture Sample is then added on top of a Constant3Vector to soften the water a little and give it an additional blue color.
The result is then altered with a Power expression for additional contrast, and multiplied with a Constant to increase brightness and strength. This result in turn is added on an Add expression, which has a Mulitply expression as its second input. This Multiply expression combines the Add expression that holds the sky before its contrast was altered, with the the final Multiply expression of the sun (Group D). Once that’s done, the Add expression is connected to another Add expression, which blends the highlight dots of Group E on top. This whole thing is then used on Emissive at the end of the material. You’re done with that part!
The only thing left to do is to take care of the opacity and the fading, this only takes two expressions. A DepthBiasedAlpha to automatically fade out, with its scale set to 500, and a constant at 0.4. The constant determines the actual amount of opacity, a higher value means more opaque and would be more desirable for deeper water.
Finally, you must also set the material itself to BLEND_Translucent and MLM_Unlit. This step was also described in Material Tutorial 1. You may also want to enable TwoSided.
You’re done! The water you just made needs to be applied to a fairly large surface with a very large scale or scaling would be off. If you wish to use it on smaller surfaces, you’d need to tweak the scale of all the distortion and dot TextureSamples. Tweaking the scale of the DepthBiasedAlpha may also be required as the fade edge may become too large on smaller surfaces.
Usually, it is also advisable to add a Heightfog actor to the whole to make the water appear more opaque in deeper parts, and, if the water can be entered, it might be a good idea to add a post process volume to blur the camera a little.
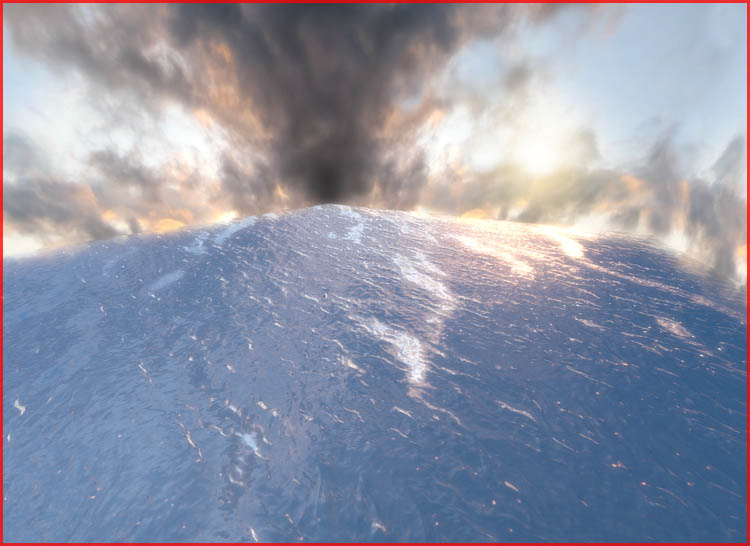
The Result